 Save
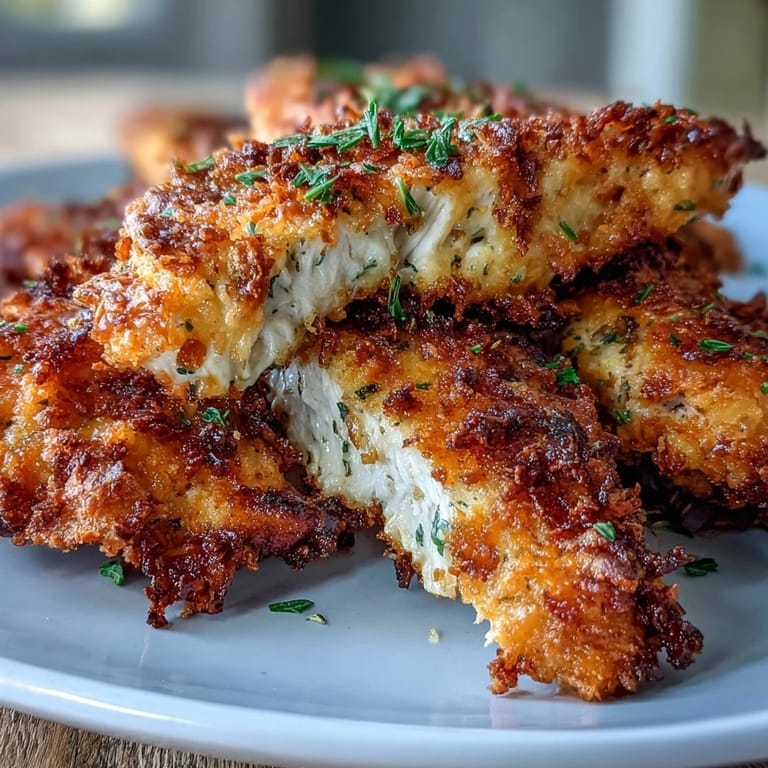
Save My nephew stood on a stool at the kitchen counter, eyes level with the baking sheet, absolutely mesmerized by the panko coating turning golden in the oven heat. He'd turned down every chicken dish I'd ever made until I tried this one, and suddenly those crispy, crunchy tenders became his favorite reason to visit. There's something about that salty ranch-seasoned crust that makes even the pickiest eater lean in for another bite.
Last Tuesday I made a double batch for my daughter's soccer team pasta night, and watched three different parents ask for the recipe while their kids devoured plate after plate. One dad admitted he'd given up cooking chicken at home because he thought it was always dry, and this completely changed his mind. That's the power of patting the chicken dry and respecting the oven temperature—turns out it's not about fancy technique, just paying attention.
Ingredients
- Chicken tenders: Use the thinner, naturally tender pieces from the breast if you can find them at the butcher, though cutting chicken breasts yourself works perfectly fine and saves money.
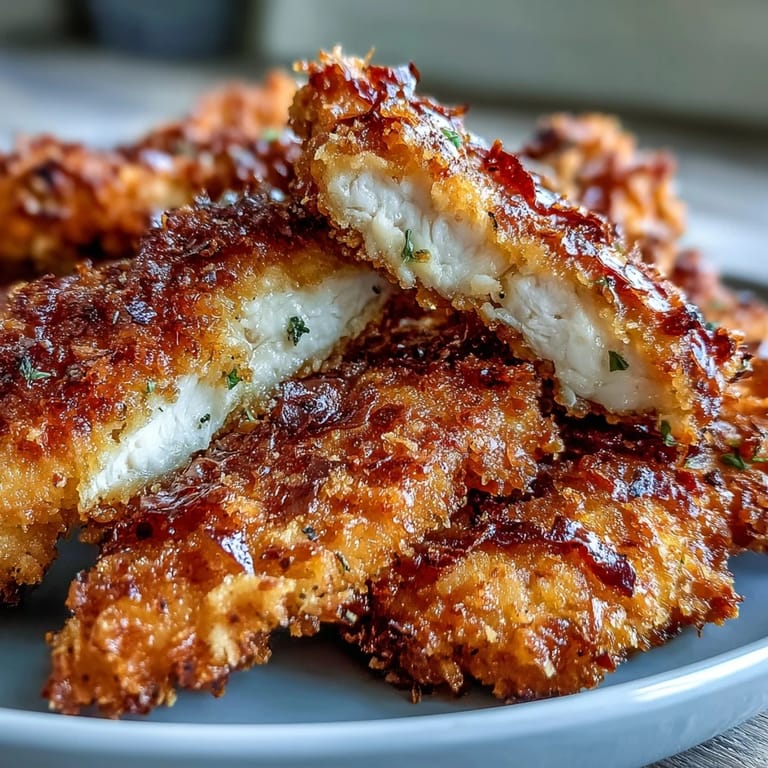
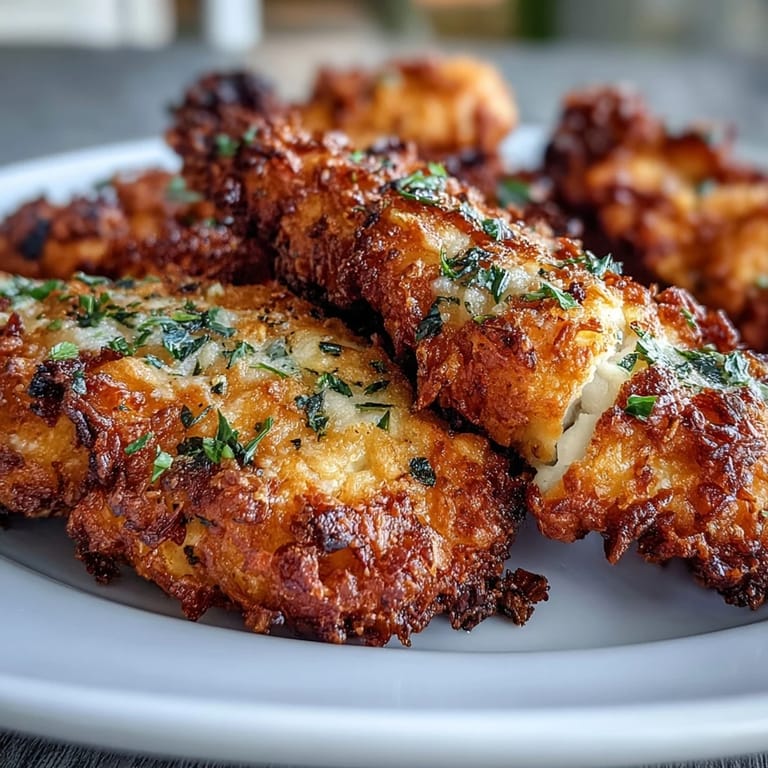
- Panko breadcrumbs: Don't skip the panko for regular breadcrumbs—the larger, airier flakes are what create that shattering crust that makes your teeth happy.
- Ranch seasoning mix: One standard packet does the heavy lifting here, flavoring the entire dish with that savory, herby profile everyone recognizes and loves.
- Paprika and garlic powder: These are your secret boost, adding depth that makes people wonder what your special ingredient is.
- Eggs and milk: This mixture acts as your glue, helping the coating stick through the heat without sliding off.
- Cooking spray or olive oil: The oil on top is what transforms baked panko from pale to golden, so don't go shy with it.
Tired of Takeout? 🥡
Get 10 meals you can make faster than delivery arrives. Seriously.
One email. No spam. Unsubscribe anytime.
Instructions
- Get your station ready:
- Preheat the oven to 425°F and set up your baking sheet with parchment paper and a wire rack on top. Spray the rack lightly so nothing sticks—this is what lifts your tenders away from any moisture and keeps them crispy on all sides.
- Prepare your wet and dry stations:
- Whisk eggs and milk together in one shallow bowl until they're smooth, then combine your panko, ranch seasoning, paprika, pepper, and garlic powder in another bowl. The shallow bowls are crucial because you'll be moving quickly from one to the next.
- Dry your chicken thoroughly:
- Pat each tender with paper towels until they feel almost dry to the touch. Moisture is the enemy of crispiness, so this step genuinely matters.
- Coat with intention:
- Dip each tender in the egg mixture, let the excess drip back into the bowl, then press it firmly into the panko mixture, making sure the coating clings all over. Some people do a double dip if they want extra crunch, and honestly, that's not a bad move.
- Arrange and oil:
- Space the tenders on your prepared rack so air can circulate all around them, then spray the tops generously with cooking spray or drizzle with olive oil. This is the moment that separates pale and boring from golden and irresistible.
- Bake with a flip:
- Bake for 9 to 11 minutes, flip each tender with tongs, then bake another 9 to 11 minutes until they're deep golden and a thermometer reads 165°F at the thickest part. The flip ensures even browning and that coveted crunch everywhere.
- Rest and serve:
- Let them cool for just a minute so the crust stays crispy, then serve immediately with whatever sauce you're in the mood for.
 Save
Save My husband came home from work one evening when I was testing this recipe, took one bite, and immediately asked if I could make these every week. I'd been overthinking chicken for years, trying fancy marinades and complicated cooking methods, when sometimes the answer is just good seasoning, proper technique, and respecting heat. Watching him demolish these tenders with my homemade honey mustard reminded me that the best meals are the ones people actually want to eat.
The Ranch Seasoning Secret
Ranch seasoning is basically a flavor shortcut that tastes like you've been chopping and measuring fresh herbs all morning, but you haven't. If you're avoiding packet mixes, you can combine dried dill, parsley, chives, garlic powder, onion powder, salt, and pepper in roughly equal parts to replicate it. The beauty is that it's forgiving—the coating still tastes delicious and familiar no matter which direction you go.
Why Oven-Baking Wins Here
Deep frying would make these more decadent, sure, but oven-baking at high heat with that strategic oil spray achieves 95 percent of the crunch with none of the oil splatters or kitchen smoke. The wire rack is the true MVP because it mimics what a deep fryer does—it suspends the chicken in circulating heat so the bottom browns just as much as the top. Once you've made them this way, you'll realize you don't actually miss the deep fryer.
Serving and Storage Ideas
These tenders are best served hot and crispy, right out of the oven, but they'll keep in an airtight container in the fridge for up to three days. Reheat them in a 350°F oven for about eight minutes to restore crispiness, and they'll taste nearly as good as the first time.
- Pair them with honey mustard, barbecue sauce, ranch dip, or even a simple lemon aioli if you're feeling fancy.
- Serve alongside roasted sweet potato fries or a simple green salad to round out the meal.
- Make them ahead and pack them cold for lunch boxes—kids and adults alike will be grateful.
 Save
Save This recipe proved to me that sometimes the simplest ideas, executed with care, become the meals people remember and ask you to make again. There's real satisfaction in watching someone's face light up at the crunch of that first bite.
Recipe FAQs
- → How do I get the panko coating to stick properly?
Pat the chicken completely dry with paper towels before dipping. Let excess egg mixture drip off, then press the panko firmly onto each tender. The dry surface helps the egg adhere, and the pressure ensures the breadcrumbs stick during baking.
- → Can I make these ahead of time?
Yes, you can bread the tenders up to 4 hours ahead and refrigerate on a parchment-lined tray. When ready to bake, add an extra 2-3 minutes to the cooking time since they'll be cold. Leftovers reheat well in a 375°F oven for 10 minutes.
- → What's the best way to store leftovers?
Store cooled tenders in an airtight container in the refrigerator for up to 4 days. For best results when reheating, use a 375°F oven for 8-10 minutes rather than the microwave, which can make the coating soggy.
- → Can I use chicken breasts instead of tenders?
Absolutely. Slice chicken breasts into even strips about 1-inch wide. Pound them slightly to an even thickness for consistent cooking. Adjust baking time as needed—thicker pieces may take a few extra minutes.
- → What dipping sauces work best with these tenders?
Honey mustard, BBQ sauce, or extra ranch are classic choices. For something different, try spicy buffalo sauce, honey garlic, or a simple honey-mustard blend made with equal parts honey and Dijon mustard.
- → How can I tell when the chicken is fully cooked?
The tenders should reach an internal temperature of 165°F (74°C) when measured with a meat thermometer. Visually, the coating should be golden brown and the chicken should feel firm when pressed, not jiggly or soft.